Welcome to CeDeFiAi, your gateway to a gamified financial experience! If you’re new to the platform, this guide will help you get started, especially with navigating the “Quests” section. Follow these steps to begin your journey and start earning rewards.
Step 1: Accessing the CeDeFiAi Website Using a Web3 Wallet

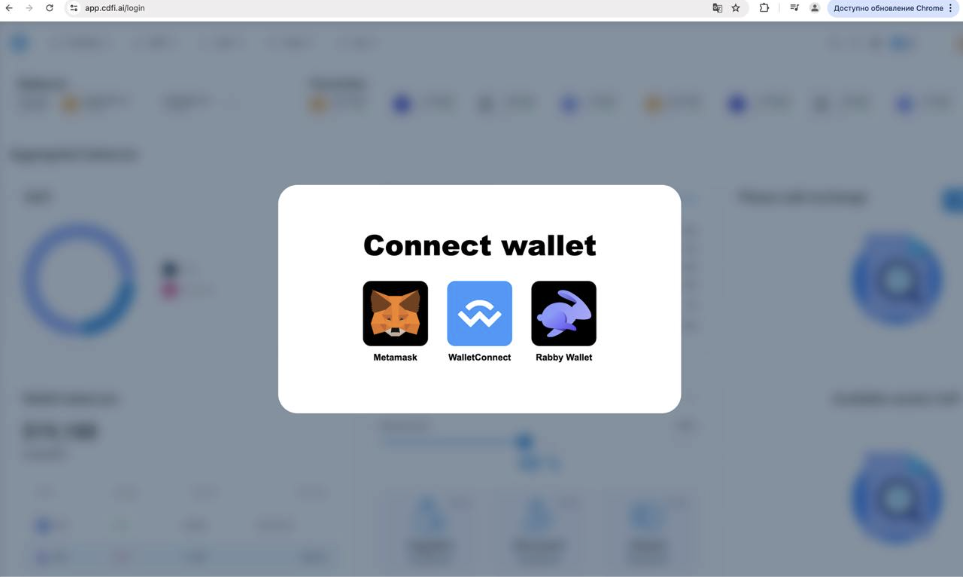
To start using the CeDeFiAi platform, you need to connect your Web3 wallet. Follow these simple steps to get started:
- Visit the Website:
Open your browser and go to app.cdfi.ai. - Connect Your Wallet:
On the homepage, you will see an option to “Connect Wallet.” Click on it. - Select Your Wallet:
A pop-up will appear with options to connect using different Web3 wallets. Choose your preferred wallet from the options provided:
•Metamask
•WalletConnect
•Rabby Wallet
- Authorize the Connection:
Follow the prompts to authorize the connection. This usually involves logging into your wallet and approving the connection request.
- Complete the Connection:
Once your wallet is connected, you will be redirected to your dashboard within the CeDeFiAi platform, and your wallet information will be displayed.
Step 2: Navigating the “Quests” Section
Locate the “Quests” tab in the top menu bar of the website.
Click on the “Quests” tab.
You will be taken to the Main Quest Dashboard. Here, you can explore various tasks, track your progress, and earn rewards. Let’s take a closer look at what this dashboard offers:
Your Nickname and Level: At the top of the page, your nickname and current level are displayed along with a progress bar that shows how much experience (XP) you need to reach the next level.
Balance: This section displays your total asset balance in USD. It also indicates how much of these assets are in DeFi and CeFi.
DeFi Volume and CeFi Volume: These blocks show the volume of your transactions in decentralized (DeFi) and centralized (CeFi) finance over the selected period (e.g., 1 day, week, month, etc.).
Transactions Count and Trades Count: This section displays the number of transactions and trades you have conducted.
Available for Claim MR Points: These points are earned by completing more complex tasks or participating in various activities. When you open an “MR Vault,” points are added to your inventory but remain locked until they become available for claim.
Vaults: the Vaults are rewarded for completing the quests and individual tasks. Higher level and harder activities yield more fruitful rewards.
There are three types of “Vaults,” each serving a specific function:
- XP Vaults (blue): XP Vaults contain XP rewards inside. XP points are required to level up and progress to other tasks
- MR Vaults (green): MR Vaults contain MR points inside. When opening such a vault, the rewards value is added to the your total counter of all MR points available for claim. Later, those could be used to access various perks of the platform or exchanged for monetary prizes.
Claiming Rewards:
When a number appears next to a Vault, it means you have an unopened Vault. To claim the reward, click on the unopened Vault and then press “Get reward”.
If it’s an XP Vault, the experience points will be added to your level. If it’s an MR Vault, MR Points will be added to your account, but they will remain locked until become available. You want to keep an eye on the announcements!
This way, you can track your progress and collect rewards that will help you advance further on the platform.
“Activation” Section:
Activation Tasks:
This section displays the tasks that need to be completed to activate your account and access additional platform features, such as “Alignment,”, “Action,” “Activate,” “Synergy Quest,” and “Daily Check In.”
Completion Progress: For each task, the completion status is shown, allowing you to see which ones have already been completed.
The Daily, Action Challenge, and Alpha Sections will be unlocked as you progress through the quests. As you complete initial tasks and earn experience, these sections will gradually become accessible, offering you more opportunities to earn rewards and advance further on the platform.
Step 3: Starting Quests
Alright, let’s get started! We will walk you through how to complete tasks using the first two sections, “Alignment” and “Action,” as examples.
Step 3: Starting Quests
Alright, let’s get started! We will walk you through how to complete tasks using the first two sections, “Alignment” and “Action,” as examples.
Example 1: Completing the “Alignment” Task
Start the Task:
– Locate the “Alignment” section on your dashboard.
– Follow the steps outlined in the task, such as passing the “Proof of Humanity” or engaging with the community.
Check your Vaults!
Example 2: Completing the “Action” Task
Start the Task:
– Navigate to the “Action” section on your dashboard.
– Tasks might include liking or reposting a post on social media.
Check your Vaults!
By following these steps, you’ll be able to efficiently complete quests and earn rewards on the platform. As you continue, other sections like “Daily,” “Action Challenge,” and “Alpha” will become available, offering you even more opportunities to engage and grow within CeDeFiAi.
Good luck, enjoy your journey and share your results in the comment section of our X (Twitter) post!
